Showing posts with label DIY. Show all posts

Thursday, September 6, 2012

DIY Make-up Brush Cleaner

I was really wanting to purchase a bottle of quick change make-up brush cleaner until I saw the price. You are supposed to be able to use it in between deep cleanings and even in between colors - like eye shadow.

So, I made my own and I LOVE it!

DIY Quick Change Make-up Brush Cleaner

- 1 C Water (I used filtered water. Distilled would work too.)
- 1/4 C Isopropal Alcohol
- 1 TBS detangler (I use a cheap kids detangler by Suave. It smells like strawberries. You could also use a leave-in conditioner.)
- 1/2 TBS shampoo (I use baby shampoo.)
- 1/2 TBS liquid laundry detergent

I mixed it all together and poured it in a spray bottle. It needs to be an 11-12oz bottle.

DIY Make-up Brush Deep Cleaning Solution
*This is a 2-step process. You can just use Step 2, but
Step 1
- 2 C Hot, Hot Water
- 2 TBS distilled, white vinegar
Soak your brushes for 20-30 minutes. I do mine in the bathroom sink because I have a LOT of brushes. I supposed you could use a cup or a bowl.

Drain the sink, rinse the brushes in hot water.

Step 2
- 2 C Hot Water
- 1 TBS shampoo (I use baby shampoo)
- 1 TBS detangler (I use the same Suave stuff as I do in the Quick Change recipe.)
Swirl the brushes around a bit. Allow them to soak 10-15 minutes. Rinse in hot water followed by cold water. Pat them dry with a towel and reshape the bristles. Allow to dry completely before using. I stand mine in a glass. You can also lay them on a towel.

NOTE: Mine take a few hours to dry, so I do this in the morning after I've applied my make-up.

Saturday, August 25, 2012

Pantry & Spice Rack Overhaul

I decided to update a few things this week - mainly the pantry (which is a closet with a metro shelf in it) because I was tired of things falling through the shelves and not sitting evenly. I went and bought a liner from Bed, Bath & Beyond. It's called LifeLiner and it's fantastic. I chose LifeLiner because it was a little thicker than the others I looked at.

I don't have a before pic, but here's an after:
That space beside the mixer houses our Cuisinart Griddler (which was being used to make waffles this morning).

I also made vinyl labels for my OXO Pop storage containers:


They looked so good that I decided to redo my spice rack. I have the Pampered Chef Turn About spice rack. Love it. However, the spice jars that I originally bought after we were married didn't fit side-by-side very well on the bottom row (the lids were too wide). I went and purchased a few different ones so that I could alternate on the bottom row.

Here's the before (This was actually when we first moved in - you can't really see what the bottom row problem looked like here, but trust me, it was annoying):

Here's the after:

And because I have a few more spices than space on the rack...


Tuesday, March 6, 2012

What I've Been Up To

I've been sewing. I know. Laugh it up. It IS pretty darn funny.

For those of you who don't know me and are asking, "Why is it funny?", you should ask my high school home ec teacher. Awful! I was AWFUL at sewing. My square pillow looked like a zig zag on one side and a half moon on the other. Not kidding.

However, about a year ago I decided to try again and recently, a lady from church let me borrow her machine so that I could make her a Nook cover.  This is a big deal! I made one for myself, but it was with mom's help AND I had a pattern for MY Nook (Nook Color). She has a Nook SimpleTouch - not.the.same.size. So, I made a new pattern and HOLY COW - it worked!

See?


I know, right?!?!?!?!

I like hers much better than mine. I did a few things differently and it worked better.

I also made a passport cover:

I'm gettin' crafty I tell ya!

I am going to try to make more passport covers and checkbook covers to sell on Etsy. What else can I make?

Oh, I've also been playing with my Silhouette CAMEO. A couple of months ago, I sent a picture of an apron to my friend, Casey (fabulous chef!). However, it was WAY too expensive, out of stock and in an ugly color. So, I made one for her:


And by the way - I am IN LOVE with my CAMEO! More projects coming soon.

Monday, January 16, 2012

Socks with Bows

So, Hubby doesn't like being called Poop Head when he is...well, a Poop Head (Joyful Noise is waiting to be seen but alas, here we sit - not watching Joyful Noise). So, I shall come up with a less offensive name for the next offense.

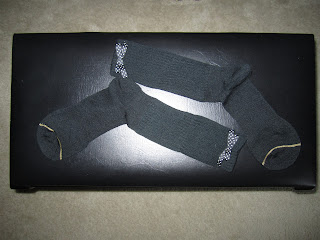
Today I sewed bows on socks.

I know. I know. What am I? 5? I need 'boot socks'. None of my socks are tall enough and I really didn't want to buy new socks so I just stole a pair of Ronnie's. This was apparently a problem because there is a sock shortage (totally not true - he has adequate sockage!) So, we went to Target and bought a 3-pack with the understanding that I simply need one pair of socks.  One. Uno. l'un. Ein. Moja (if you speak Swahili). However, when doing laundry, how would I know which pair was mine?

You see where I'm going with this.


You love it, don't you?  You are jealous that you don't have a pair of men's socks with bows on them, right? 

Thursday, September 8, 2011

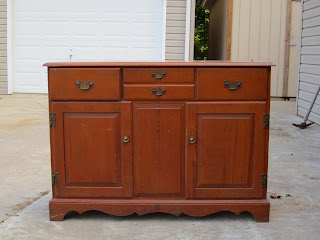
Sideboard Project

Ok, let me begin by saying that I'm not sure that I will EVER refinish another piece of furniture as long as I live. Perhaps its the fact that it was 1000 degrees every single day I worked on it and I sweated away about 50 lbs (I swear I did) yet the scale didn't budge.

I had intentions of taking step by step pics of the process, but she didn't happen. I was so aggravated by day 2 that pictures were the LAST thing I was thinking about!

Before:

There were DAYS of sanding, painting and staining (and by that I mean sweating profusely). The sander worked like a dream. The new Wagner paint sprayer - not so much. I have never used one so it could have been operator error, but it was a pain!!! I did learn alot while working on this project - don't wear flip-flops while spray painting unless you like the speckled look, how to fill holes because drawer handles don't come in standard sizes, how NOT to shop for hinges (just paint the ones that originally came on there-they aren't standard either), how polyurethane dries a yellowish-brown color on white. I ended up rattle canning some of it to cover the stupid yellow tint. Nevertheless, here it is! The picture isn't the greatest, but the top is stained a dark mahogany.


Sunday, July 31, 2011

Jewelry Storage

So, I've been trying to figure out a good way to hang my necklaces and earrings. I had this frame that I found on the clearance aisle at Hobby Lobby (I <3 Hobby Lobby) and I came up with this. I had to touch up a few spots on the frame...nothing a stain marker and a paper towel can't fix. The tool not shown is a drill. I didn't think I would need it. I did. I drilled holes 1" apart, screwed in the hooks, and stapled the screen material to the frame. I have extra screen material. I'm thinking of finding some more frames and making desktop earring holders to sell. I'm thinking Etsy.


Friday, May 20, 2011

Gift Wrap Embellishments

I'm posting this because I want to have a quick reference to it. I love to gift wrap and these embellishments are cute and cheap!
I found this on Martha Stewart's Whole Living site: 

Bows from Magazine Pages

Paper bags, old newspapers, fabric scraps -- you're probably already using them for eco-friendly gift wrap. But did you know you could create beautiful bows from the pages of our magazine?

You'll need a page per bow (best if mostly one color) and some double-sided tape.

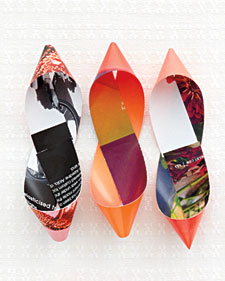
Cut the page lengthwise into nine 3/4-inch-thick strips of heights shown: Three at 11 inches, three at 10 inches, two at 9 inches, and one at 3 1/2 inches. 

Twist each strip to form loops at both ends. Make a circle out of the smallest.

Secure the ends with a piece of double-sided tape.

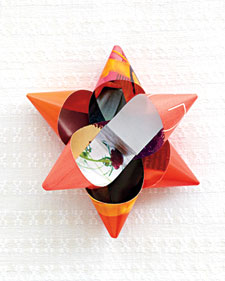
Layer and stick, starting with the longest strips. End with the circle in the center.

From Whole Living, December 2010


I found these on a blog that I follow. You can access the tutorial here.
PaperRoseGiftBowFinale2

Thursday, May 19, 2011

Projects

During my month long break, I sewed. For those of you who know me, stop laughing! I was looking for things that I could do that were not related to music. My granny and my mom have always sewn and I always didn't. So, I decided it was time to try my hand at it again. I'm getting married and I don't want to have to staple pants to hem them (crystal). Sewing was a good way to spend some time with my momma.

I made keychains...LOTS of keychains. I am going to have to set up an etsy shop. No those aren't the same ones. Those are 2 separate piles.

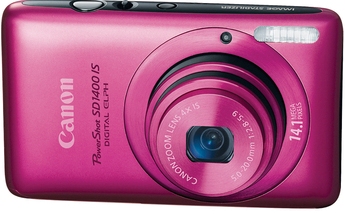
I also made a case for my new camera that Precious bought me for my birthday. This is the camera: 

PowerShot SD-1400  IS 14.1 Megapixel, 4x Wide Angle Optical  IS Image Stabilized Zoom Lens, 2.7 Inch LCD Screen, HD Movie With HDMI Output Digital Elph Camera - Pink *FREE SHIPPING*

This is my case! YAY me!


I also made a cover for my Nook Color! This required a LOT of help from momma. However, I think I could do it again mostly by myself now that I know what I am doing.


Next project? I have a pattern for a messenger bag. I have to wait until I have more time, though...maybe over the summer.

Saturday, May 14, 2011

Cute Flower Balls

I LOVE this idea and wanted to share it!


Click HERE to access the tutorial...aren't they adorable?

The blog where I found them actually placed them on taper holders rather than hanging them:

Saturday, April 16, 2011

Chair Rescue

The Tale of a Rescued Chair

There once was a chair. It was a nice chair - beautiful wood. However, the chair wasn't pleasant to sit on and it's covering dated it terribly. Oh yeah, and it had wheels on it's front 2 legs.
You get the picture. I LOVE this chair, but it needs new padding and something other than that ugly 70s thing to cover it. Who thought that was a good idea anyways? And wheels? On the front legs only? Really?
 

And THIS was the cushion....not much for comfort were they?
 

(NOTE: I'm bad at this whole taking pictures of the entire process thing. I replaced the cushion. Forgot to take a pic of that. I touched up some scratches on the chair. Forgot to take a pic of that.)


A Brand New, Happy Chair
casters, not wheels
a close-up of the trim
  TA-DA!


Thursday, March 10, 2011

Spring Has Sprung

So, I love my windows at the studio, but after I took down Christmas I really wasn't sure what I wanted to do. I thought about putting the paper lanterns back up (they will go back up eventually), but I was really in a "spring" mood. So, here is my cheap solution.

Butterflies cut out with a Cricut:
And tissue paper flowers that start like this:
And end up like this:
and this

It may not feel like Spring yet, but it's looking alot more spring-like at Versatile Vocalists and I'm super happy about it.

Yes, I Think I DO Need One of These

You have to see this: Red Door Abode: Serve Me Up!

She took this:
and turned it into this:
And yes, those are wine bottles on the bottom...there are slots for them so they don't roll
...an honest-to-goodness wine rack.

What's in the drawers?

So glad you asked.

stemless glasses, napkins, bottle opener...

Yes, I think I DO need one of these!

Monday, March 7, 2011

Cute Spring Deco Idea

So, I was browsing Women Who Do It All and I found this cute project she did using water bottles. It's part of the Spring Mantel party she's hosting.


She used a tutorial from The Harrigan Howdy. She used acrylic paint instead of spray paint because it's a lot cheaper and she used a needle and thread to hang them because her bottles were really thin plastic. I'm not sure if I'll make anything like this right now because I already have my spring deco projects in motion. If you try this, be certain to post pics and let me know. I'd love to see it!
 

Template by Blogger Candy